Key Takeaways
- A dowel jig helps you drill straight, centered holes for dowel joints in wood.
- You can make a simple, accurate jig at home using scrap hardwood, a drill, and a few basic tools.
- The most important thing is accuracy: careful measuring and drilling once saves a lot of frustration later.
- Start with a basic block-style jig, then upgrade with extras like metal bushings or an adjustable fence if you want.
- Always clamp your work and follow basic tool safety when drilling.
To make a simple dowel jig, cut a hardwood block to size, mark the center line, and drill one or more straight guide holes through the block using a drill press if possible. These guide holes control your drill bit so it stays straight and in the same spot every time. You then clamp the block to your workpiece, align the marks, and drill through the jig into the wood. With careful measuring and drilling, this homemade jig gives you clean, repeatable dowel holes for strong wood joints.
Introduction: The Day Your “Close Enough” Holes Stop Being Cute
If you’ve ever tried to drill matching dowel holes by hand, you probably know this feeling:
You measure.
You mark.
You drill.
You join the pieces and… they don’t line up. At all.
The boards slide. The dowels won’t go in. And you’re staring at your project wondering where your life went wrong.
The truth is, even a steady hand has a hard time keeping drill bits perfectly straight and centered. That’s where a dowel jig comes in. It acts like a little “hole boss” that tells your drill bit exactly where to go.
And the good news? You don’t have to buy one. You can make your own dowel jig with simple tools and a bit of patience. I’ll walk you through it step by step, in plain English, so you can start making strong, clean dowel joints without the headache.
Read Also: Best Dowel JIG
What Is a Dowel Jig and Why Make Your Own?
What a Dowel Jig Does
A dowel jig is a small tool that:
- Guides your drill bit
- Keeps holes straight and square
- Helps place holes in the same spot on matching pieces
This matters when:
- Joining two boards edge-to-edge
- Making right-angle joints (like shelves and sides)
- Building simple frames or furniture
Why Make One Instead of Buying?
Store-bought jigs are great, but making your own has perks:
- Cheaper if you already have some tools and scrap wood
- You can size it for your usual projects
- It’s a nice, small woodworking project to improve your accuracy skills
Plus, there’s something very satisfying about using a tool you built yourself to build other things.
Tools and Materials You’ll Need
You don’t need a full pro shop for this. Just a few basics.
Tools
- Drill (hand drill or drill press; drill press is best for accuracy)
- Drill bits (the size of the dowels you plan to use, like 1/4″, 3/8″, or 1/2″)
- Tape measure or ruler
- Pencil
- Square (for straight lines)
- Clamps (to hold the jig and workpiece)
- Sandpaper
Nice-to-have but optional:
- Drill press (for very accurate guide holes)
- Countersink bit (if you want to add screws later)
Materials
- Small block of hardwood (like maple, oak, or beech)
- Optional: metal drill bushings (for long-lasting guide holes)
Here’s a simple example for the main jig block:
| Part | Suggested Size (Approx.) |
|---|---|
| Jig block | 1 1/2″ thick x 2″ wide x 4–6″ long |
| Dowel size | Common: 1/4″, 3/8″, 1/2″ |
You can adjust these sizes to fit what you have, but keep the block thick and strong so it doesn’t split.
Step-by-Step: Making a Simple Block-Style Dowel Jig
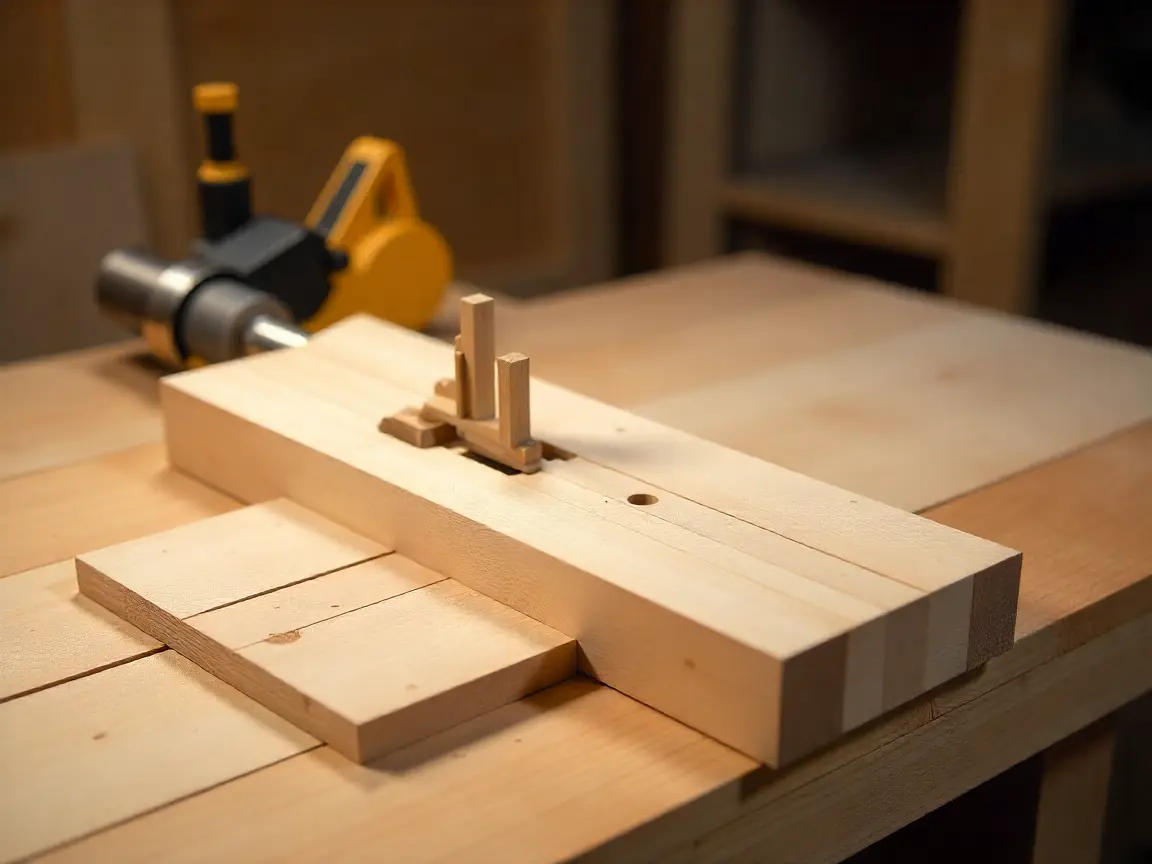
We’ll start with the simplest version: a solid hardwood block with one or more straight guide holes. This alone can do a lot.
Step 1: Cut and Square the Jig Block
- Cut your hardwood block to size (for example, 1 1/2″ x 2″ x 5″).
- Make sure the edges are square (90°) and the faces are flat.
- Lightly sand off any splinters or rough spots.
You want at least one long edge that is straight and smooth, because that will sit against the edge of your workpiece.
Step 2: Mark the Center Line
- Choose the long edge that will be your reference edge.
- Measure the width of the block (for example, 2″).
- Mark the center of that width (1″ in this example).
- Use a square to draw a center line down the length of the block along the top face.
This line shows where your dowel holes will be centered.
Step 3: Lay Out the Hole Positions
Think about how you’ll use the jig:
- For simple edge joints, you might want one center hole.
- For more flexibility, you can add two or three spaced holes.
Example:
- Mark a hole at the center of the block length.
- Mark one hole 1″ from one end, and another 1″ from the other end.
Make a small cross (+) at each spot where the center line meets your measured distance. That’s where you’ll drill.
Step 4: Drill the Guide Holes (Accuracy Matters Here)
If you have a drill press, use it. If not, go slow with a hand drill and use a square to help keep the bit vertical.
- Clamp the block securely so it won’t move.
- Align the drill bit with your first cross mark.
- Drill straight down through the block.
- Repeat for each hole you laid out.
Tips:
- Use the same size drill bit as your dowels.
- If you plan to use metal bushings, drill the hole to match the outer size of the bushing, then press the bushing in.
- Take your time—this step makes or breaks how accurate your jig will be.
Step 5: Clean Up and Label the Jig
- Lightly sand any sharp edges.
- Write the dowel size near each hole (like “1/4” or “3/8”) with a pencil or marker.
- If you made multiple holes, you can also label spacing (“End”, “Middle”) to remember how you planned to use them.
Your basic dowel jig is now ready to use. Not bad for a block of wood and a few holes.
How to Use Your Homemade Dowel Jig
Now that you’ve built it, let’s actually drill some joints.
Using the Jig on Board Edges
Imagine you’re joining two boards edge to edge with dowels.
- Mark the joint:
- Draw a line across the edges where you want each dowel to go.
- Align the jig:
- Place your jig on the edge so the guide hole lines up with your mark.
- The reference edge of the jig should be flush with the face of the board.
- Clamp the jig in place so it doesn’t shift.
- Insert the drill bit through the guide hole and drill into the board to the depth you need.
- Repeat on the matching board, using the same marks and hole positions.
If your lines and clamping are consistent, the dowel holes in both boards should line up nicely.
Using the Jig for Right-Angle Joints
You can also use your jig to drill into the face of one board and the edge of another, like for a shelf meeting a side panel.
- Mark the matching positions on both pieces.
- Clamp the jig square to each surface.
- Drill carefully to the same depth on both pieces.
Optional Upgrades to Make Your Jig Even Better
Once the basic version works, you can upgrade it if you enjoy tinkering.
Add Metal Drill Bushings
Metal bushings help your jig last longer and keep the holes from wearing out.
- Buy bushings that match your preferred drill bit sizes.
- Drill the block to the outer diameter of the bushings.
- Press or tap the bushings into the holes.
Now your drill rides on metal instead of wood, which keeps things accurate over time.
Add a Simple Fence
A fence helps you set a repeatable distance from the edge of your board.
You can:
- Screw or glue a second piece of wood perpendicular to the jig block to act as a fence.
- Or add slotted holes and a sliding fence piece for adjustability (a bit more advanced).
This way, you can quickly register the jig at the same distance from the edge without re-measuring each time.
Add Depth Stops
To avoid drilling too deep, consider:
- A collar on your drill bit (depth stop collar)
- A simple piece of tape wrapped around the bit at the desired depth
Not fancy, but very effective.
Safety Tips While Making and Using a Dowel Jig
Power tools and spinning drill bits are no joke. A few reminders:
- Always clamp your work—both when making the jig and using it.
- Keep fingers clear of the drill bit path.
- Wear safety glasses when drilling.
- Don’t force the drill; let the bit do the work.
- Keep loose clothing, hair, and jewelry away from moving parts.
A good jig is one that lets you work safer, not just more accurate.
Common Mistakes (And How to Avoid Them)
- Crooked guide holes:
- Use a drill press if possible. If not, check yourself against a square while drilling.
- Misaligned dowel joints:
- Double-check your marks on both pieces before drilling.
- Jig slipping while drilling:
- Use clamps. Don’t rely only on your hands to hold it.
- Using soft wood for the jig:
- Softwood wears out faster and gets sloppy. Hardwood is worth it.
Frequently Asked Questions
Use a hardwood like maple, oak, or beech. It’s more durable and keeps the guide holes more accurate over time than softwood.
No, but a drill press makes it easier to drill perfectly straight guide holes. If you’re using a hand drill, go slow, use a square to check your angle, and take your time.
Yes. You can drill multiple guide holes in the same block for different sizes and label each one. Or make separate jigs for each size if you prefer.
A common rule is to drill each hole a little more than half the dowel length, so the dowel can sit fully in both boards with a bit of extra space for glue. For example, for a 1 1/2″ dowel, you might drill about 3/4″ to 7/8″ into each piece.
If you build it carefully and use hardwood (and maybe add metal bushings), a homemade jig can be very accurate for many projects. High-end commercial jigs offer more features and quick adjustments, but for basic dowel joints, a DIY jig works great.
Summary of the Blog
Making a dowel jig isn’t about building something fancy—it’s about creating a simple, accurate guide that helps you drill straight, repeatable holes. You start with a hardwood block, mark a clear center line, and drill precise guide holes. Then you clamp it to your workpieces and let the jig keep your drill on track.
From there, you can upgrade with metal bushings, fences, and depth stops if you want. With this small DIY tool, you can finally stop fighting crooked dowels and start making stronger, cleaner wood joints—with a jig you built yourself.