Are you tired of dealing with water damage and skyrocketing water bills caused by an underground leaking water pipe? If so, you’re not alone. Leaks can occur in underground leaking water pipes for various reasons, from age and corrosion to shifting soil and tree roots. Whatever the cause, it requires immediate attention to prevent further damage and expense.
Ignoring underground leaking water pipes can lead to more extensive damage and higher repair costs. It’s crucial to take action as soon as you notice signs of a leak, such as low water pressure or damp spots in your yard or basement.
Fortunately, fixing an underground leaky water pipe is more manageable than it may seem. You can get the job done quickly and effectively with the right tools, knowledge, and approach. So, let’s get into it and learn how to fix an underground leaking water pipe.
Identify the Location of the Leak
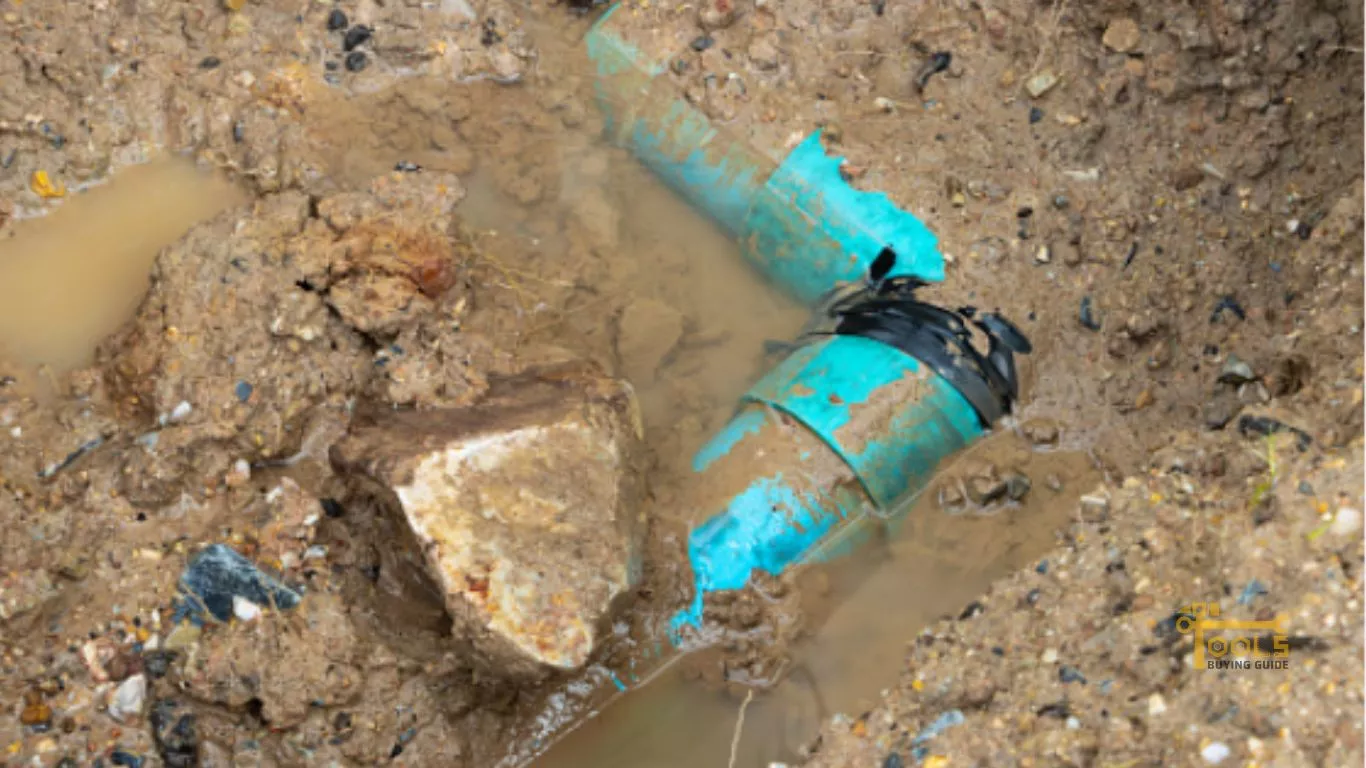
The first step in fixing an underground leaky water pipe is identifying its location. This may seem daunting, but there are several ways to determine where the leak is coming from. First, turn off all water sources and check the water meter to see if the water is still flowing. If the meter is still running, this indicates that water is still being used and there is likely a leak somewhere.
Next, check for any visible signs of water on the ground or walls. Look for damp spots, mold growth, or discoloration, as these can all indicate the presence of a leak.
If you still can’t locate the leak, consider using a leak detection tool or hiring a professional to pinpoint the exact location. These tools use various methods to detect the sound or movement of water, allowing you to pinpoint the exact location of the leak.
Identifying the leak’s location is crucial in determining the best repair method and minimizing damage to your property. Take the time to thoroughly inspect and locate the leak before proceeding with repairs.
Determine the Extent of the Damage
Once you have identified the location of the underground water leak, the next step is to assess the extent of the damage. This involves determining how much water has leaked and its potential impact on the surrounding structures. Check for any signs of water damage, such as dampness, mold growth, or discoloration on walls and floors.
It’s also important to determine the depth and size of the leak. This information will help you choose the appropriate repair method and materials. You may need to excavate the area to expose the damaged pipe and make the necessary repairs.
In addition, take note of the surrounding utilities and infrastructure. The location of gas lines, electrical cables, and other underground structures can affect the repair process. Be sure to mark their locations and exercise caution when excavating the area.
Assessing the damage and taking note of the surrounding infrastructure will help you plan for the repair and ensure that it is completed safely and effectively. It’s crucial to take the time to thoroughly evaluate the situation before proceeding with repairs.
Determine the Best Repair Method
Once you have assessed the damage and determined the size and location of the underground water leak, the next step is to choose the best repair method. There are several options available, and the right method will depend on the damage’s extent and the leak’s location.
One common repair method is pipe replacement. This involves excavating the damaged pipe and replacing it with a new one. This method is best suited for leaks near the surface and where the damaged section of the pipe is relatively small.
Spot repair is another option that involves making a small repair to the damaged section of the pipe. This method suits minor leaks and can be less invasive than pipe replacement.
Finally, relining involves inserting a new lining into the damaged pipe, essentially creating a new pipe within the old one. This method can be effective for larger leaks and is less invasive than pipe replacement.
Choosing the appropriate repair method is crucial to ensuring the repair is effective and long-lasting. Consider the extent and location of the leak before deciding on the best method for your situation.
Read More about How to improve Lawn Movers
Prepare the Site for Repair
Before beginning the repair process, it’s essential to prepare the site to ensure a safe and effective repair. This involves excavating the area around the leak to expose the damaged pipe, cleaning the area, and removing any debris that could interfere with the repair.
Additionally, it’s important to turn off any gas or electrical lines near the repair site to prevent any accidents or damage during the repair process. Taking the time to prepare the site properly can help minimize the risk of further damage and ensure a successful repair.
Make the Repair
After choosing the appropriate repair method and preparing the site, the next step is to make the necessary repairs. This involves cutting out the damaged section of the pipe or preparing the pipe for repair or relining, depending on the chosen method.
Once the damaged section of the pipe has been removed or repaired, the new pipe or repaired section should be installed using appropriate materials and methods. It’s important to ensure the repair is completed correctly to prevent further leaks or damage.
Finally, it’s essential to test the repaired area to ensure there are no leaks and the repair is effective. This can involve a visual inspection and pressure testing to confirm that the repaired area is watertight.
Repairing is a critical step in fixing an underground water leak, and it’s important to take the time to ensure that the repair is done correctly to prevent any further damage or issues.
Backfill and Clean-Up
After making the necessary repairs, it’s essential to backfill the hole around the repair site with the appropriate materials, such as soil or gravel. This helps to ensure that the repaired area is stable and secure.
Once the hole is filled, the area should be restored to its original condition. This can involve replacing removed landscaping or paving and ensuring the area is clean and tidy.
It’s also important to appropriately dispose of any waste materials from the repair, such as old pipes or debris. Proper disposal helps ensure that the environment is protected and the repair site is safe and secure.
By taking the time to backfill and clean up the repair site properly, you can ensure that your underground water leak repair is complete and effective, with minimal impact on the surrounding area.
Final Inspection
The final step in fixing an underground water leak is to inspect the repair site. This involves ensuring that the repair has been completed to the appropriate standards and that there are no additional leaks or damage.
During the inspection, it’s essential to document the repair for future reference. This can include taking photos or videos of the repair site and keeping records of the repair method and materials used.
By conducting a thorough final inspection and documenting the repair, you can ensure that the repair is complete and effective and that you have a record for future reference.
FAQs
Signs of an underground water pipe leak include unusually high water bills, damp spots or puddles in your yard, low water pressure, and the sound of running water when no faucets are open.
Yes, you can fix an underground water pipe leak yourself if you have basic plumbing skills and the right tools. However, for major leaks or if you’re unsure, it’s best to hire a professional plumber to ensure the job is done correctly.
To fix an underground water pipe leak, you’ll typically need a shovel, pipe cutter, pipe fittings, PVC or copper pipes (depending on your existing pipes), primer and cement for PVC pipes, pipe wrench, and leak repair clamps.
To locate the exact spot of the leak, look for damp areas or puddles in your yard. You can also use a listening device to detect the sound of running water underground or hire a professional to use specialized leak detection equipment.
Shut off the water supply.
Excavate the area around the leak.
Identify the damaged section of the pipe.
Cut out the damaged section.
Replace with new pipe and fittings.
Secure the connections.
Test the repair by turning the water back on.
Fill the trench and restore the surface.
To prevent future leaks, ensure proper installation and use high-quality materials. Regularly inspect your plumbing system for signs of wear and tear. Insulate pipes to protect them from freezing, and maintain appropriate water pressure to avoid stressing the pipes.
Conclusion
Fixing an underground water leak requires a systematic approach to ensure the repair is completed effectively and safely. Following the steps outlined in this guide, you can identify the location and extent of the leak, choose the appropriate repair method, prepare the site, make the necessary repairs, backfill and clean up, and conduct a final inspection to ensure the repair is complete.
It’s important to take the time to conduct each step carefully and thoroughly to prevent any further damage or issues. With these steps, you can fix an underground water leak and ensure your property is protected from further damage.
Recommendation about Angle Grinder Disc For Paint Removal


[…] art of cutting copper pipe is a skill that all aspiring DIYers should master. Whether you’re a beginner or an […]
[…] lead to costly repairs and water wastage. In this article, we will guide you through the process of fixing an underground leaking water pipe step by step, ensuring that you can address the issue effectively and […]